Showing posts with label colour. Show all posts

Wednesday, 13 July 2016

Photo walk around Lacock Village

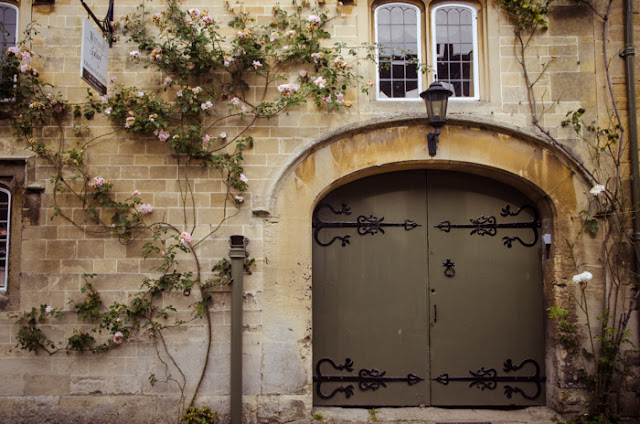
      Last week on my day off I decided to get out of Bristol and go for a bit of an explore. My parents house is near Grittleton in Wiltshire, and there are many villages in the area which I used to frequent, whether on my bike or driving over for an explore! Lacock is one of my favourites, it has kept very traditional with its cobbled streets and quaint houses with decorated windows! Lacock is also famous for being featured in TV shows and films including Harry Potter, Cranford, Downton Abbey and Pride & Prejudice. 

      The lighting on this day was very flat and subdued, the skies were overcast and gray meaning a lot of the buildings I photographed needed a bit of a boost in the contrast. I have been using Lightroom more and more recently to experiment with adding my own levels of vintage style filter. I tend to do an initial lighting and colour correction edit before making a virtual copy which I then edit more heavily! 

*Quick tip - Creating virtual copies in Lightroom is great to make different versions of the same photo without losing or overriding your initial edits. Click Command+' (mac) or Control+' (windows) to create another copy of that image before adding your edits! Great for creating a colour version and then one in Black and white or sepia, or for trying a few crop variations. 

      I have been using lens correction tools to create vignetting and also playing around with split toning and camera calibration to add different tones to the images. 


      This raspberry bush really came out with this filter! I loved the subtle colours it creates. 


      The two above images both needed some contrast to bring out the patterns in the bricks and the shadows from the vines.


      Just a few of my favourites from the day! Let me know what you think, what are your favourite photography/drawing locations?!

Thursday, 9 June 2016

Wild Place Project

      I read a blog post a while ago about photography tips to get you inspired. One of those tips was to make the effort to keep going back to the same place a number of times to get yourself more familiar and to challenge yourself to create new images with the same subject. I went to Wild Place in Bristol at the start of April, it is kind of a cross between a zoo (with much larger enclosures than Bristol zoo in the city) a kids play area and wild gardens. 

      I really enjoyed walking round the area as it is very open and quiet, even if it is just off of the motorway! There are lots of wild flowers all around with lots of different colours and they also have their own gardens which are maintained by staff. The walk round takes you to different animal enclosures - the meerkats and lemurs are the most fun I think. There is also a lot for kids to do including lots of mini playgrounds with tyres and dens and also a barefoot walk with lots of textures and materials, including mud, for kids to run through. 

      I signed up for an annual pass after the end of my first trip and now I have been back twice. I have only been in the week but even though there are lots of kids, the area is so spread out it has felt incredibly quiet and nice to just walk around alone and explore in the woods and gardens. 

      Each time I have visited I have taken a different lense with me which I think has helped get different images each time. With my Nikon D5100 I use:

Sigma 17-50mm f2.8
Nikon 35mm Prime f1.8
Nikon 55-200mm f4-5.6

      Todays shots were with the zoom lense, which was interesting as it helped me get some super close up of animals faces like the meerkat below:


      The lemurs are in an enclosure you can walk around which means I could get really close to them. There have been a few new babies over the past couple of months which has been good to capture. 


      These brown lemurs (feel free to help me out with the species) are very friendly, I got the photo of this one in the tree just before one poo-ed on my arm... not so fun!


      As well as the larger animals I have found this area great for getting up really close to flowers and smaller bugs. I think I may have to get a macro lense or extension tubes at some point so I can get even closer! 


Thursday, 10 March 2016

Introduction to Visual Merchandising Review

      So many of you who know me personally know I do visual merchandising as part of my job. Working for an electronics retailer means the scope of this is fairly limited as it mostly comes down to tidying phone accessories and speakers and fixing cables on a daily basis! Last year I decided I wanted to see if I could expand my creative eye into something down the fashion/homeware route. I did a lot of research into short courses and I stumbled upon a 3 day course on "Introduction To Visual Merchandising" at the Fashion Retail Academy in London. 
      I chose this course because the website blurb said it was a very practical course which involved you learning lots of skills before putting them together on the last day and creating your own window display from scratch. I loved the idea of building something from nothing and was interested to see how much we could actually learn in such a short space of time!

Day 1 - 

      For the duration of this course I stayed with my sister in Mile End as she was working in London over the summer. I would recommend staying in or close to London if you are doing a course like this as I was exhausted each day and the thought of getting a long train would not have been good! Safestay in Elephant and Castle is a place I have stayed 3-4 times and can recommend it as the premier Inn of hostels! Everything is purple and very cosy and you get a surprisingly decent breakfast included. 
      The Academy is around 10 minutes walk from Oxford Street tube, 2 minutes from Tottenham Court Road. We arrived and all sat down in a classroom full of undressed mannequins - an interesting start to the day! There was a small group of around 8 of us, we all introduced ourselves and said a bit about what we do and what experience we have. There was a huge range of backgrounds, one girl worked in John Lewis, another in a football club and another had her own company selling products across Europe. 
      We had a short powerpoint with some history of visual merchandising and window displays. We got to see some interesting examples and find out some merchandising techniques. The rest of the day was spent getting involved and merchandising a wall which had magnetic shelves and clothes rails which we could move around to our hearts content! This was pretty fun if hard work.


We had a winter collection and a more summery set of clothing to hang, it took a good amount of adjusting to get these to a point where everyone was happy. 


      After doing the larger merchandising we moved onto accessories and jewellery. The rest of the afternoon focused on us picking a set of things and using pyramid merchandising to arrange the objects in an interesting way. My attempts are below, we had a very short space of time to pick our products and arrange them and I would have liked to have spent a little longer. 


      One thing I will say about day 1 is that I was surprised how much we fitted in. It was a huge amount of information and I felt we did a lot in a short 10-4pm day. The only slight negative to the college is that it is a bit rough around the edges! Do not wear fancy clothes to this type of course, it will only make you uncomfortable and worried about getting messy. The shelves we were merchandising were pretty covered in dirt and dust which I wasn't expecting, maybe because it was the summer and they hadn't been in use for a few weeks... The clothes we had were pretty good but the accessories and jewellery varied in wear and tear and nice-ness. There was a lot of trashy stuff which you had to sift through, though our tutor made the point that in a job you don't choose what you merchandise and you should be able to make anything look good!


Day 2 - 

      Our second day was centered around mannequin grouping and styling. We started off talking about different types of mannequins, ranging from very abstract to the more realistic with facial expressions and makeup. We each got to pick a mannequin to dress and were shown how to move them the proper way and how to remove limbs and re-attach them (such a strange thing to learn!). This is my first mannequin dressing, I chose her because of her funky festival hair! 


We then got put into pairs and we were given a space to fill with a group of 3 mannequins. We had to arrange them at different levels and then gather lots of different clothes to create a group with similar styles and colours. Ours went a little bit H&M/New Look folksy with lots of 70's suede and fur in browns and beiges!


Here is one by another pair which I really liked - this one was very pop art punk rock, I loved the attitude of the mannequins they chose!


      One of the last things we learnt about that day was dressing bust forms, we learnt about making tissue paper arms - something I never knew was a thing! We each had to use some layering of a jumper and a jersey top so we could style the arms and give the models some life. 


Day 3 - 

      The final day was by far the most fun, and the most knackering! All this lugging around of mannequins and running around hunting for good clothes is super hard work by the way so if you do take one of these course wear good shoes and comfy clothes. 
      We had a room full of props to have some fun with and everyone was being a little cheeky trying to get the best stuff. There was definitely a little bit of competitive spirit that day even though it wasn't a competition for the best window, we all wanted to do something impressive! We worked in pairs again, me and my partner found a bag full of sparkly black artificial vines with leaves on. I liked the idea of using these to make shadowy shapes in our background. We also had lots of small pink flowers to add to the edges to bring some colour to the display.


      Our models were naked for a lot of the day! Picking matching clothes was the hardest part for some reason... We spent half the day staple gunning flowers to the walls and getting bits of glitter and flower petals everywhere.


      The finishing touches to the display were adding some artificial coloured birds and a bird cage before getting some spotlights to add to the shadows. 


      So above is our completed window, which I was pretty happy with for  first attempt. Below we have the other two groups. I loved the very different concepts we all ended up with, though we did all fight over the pink flowers as you may be able to tell!


      I finished this course feeling happy with the huge amount we achieved in 3 days, I think it is a great introduction to a lot of different skills. For me I knew I would then need to find ways of expanding and practising what I have learnt which I have found hard over the past 6 months! Still, I hope this can give a good overview of the course for anyone who is looking into it and maybe help you see if it is for you or not.


Monday, 15 February 2016

Day 2 - Searching for lines

     Ok so the last blog post I wrote was day 1 of a composition photography challenge searching out interesting light. This day's challenge we were meant to keep searching for light, but look for interesting compositional lines as well!

     It was a horribly rainy saturday, me and the boyf decided to go to theWildlife Photographer of the year exhibition at M Shed in Bristol. It is definitely worth a visit, some truly incredible photos, though I suggest avoiding weekends when it is raining as it was full of noisy kids and we queued to get in...

     I took a grand total of around 12 photos because I hate rain, and there really wasn't much interesting light to be found on such a grey day. Bristol is famous for having rows of colourful houses in some areas and I loved the look of these pastel coloured ones by the waterway. 


There was a dreary blue colour cast which I fixed, I also brightened up the sky and saturation a little to try and bring this image out of the grey. 


This second image is a few more houses, I really liked the line of aerials against the sky like little wire flags!


     My final images were of some very rustic looking cranes by the waterside. I wanted these to be quite monochrome against the stark sky so I pushed down the saturation and exaggerated the lights and darks to make the images more contrasty. 


     In all I could have spent more time taking photos this day, I like these few but I would like to have spent more time if it hadn't been raining so horribly!


Friday, 12 February 2016

Starting Fresh

     So it is still very much feeling like new year for me. I know it is February, but since I spent most of January in America travelling and then coming home and being jet-lagged I am still very much in the "new year" mindset. It has been a long time since I posted on this blog. The last few posts have been me sharing interesting artsy things I have found and it feels like a very long time since I did anything super creative! 

     Time really starts to fly when you finish university, it has been over 2 years now and I have decided to get motivated and take some time to focus on getting my skill set back up and focusing on learning some new things. I have had an account with Lynda.com for a long time now, they have a huge range of tutorials on all manner of design/marketing/software subjects. 

     So the first thing I have decided to focus on is photography. I have always been interested in photography, most of my experimentation has been as a self taught amateur with a lot of make shift tools but I just bought myself a new camera lens and wanted to try it out.

     I have taken two courses so far, one on Colour Correction in Lightroom and one on Low Light photography, both focused quite heavily on fixing White Balance in images after they have been taken. To start practising I also watched day one of a 5 day photo challenge which started with a challenge to go out searching for interesting light and see what you can come up with.

     These images include a couple I took of some flowers in my house when I first got the lens and the rest are from a walk I took all around Stoke Park Estate in Bristol. When walking around i tried to focus on finding areas where the light was bringing out highlights on leaves and trees.


     Ok so here is a little picture of my workspace on Lightroom. One of the biggest things I learnt on the Colour Correction course is how to use the Eyedropper tool to fix White Balance. Clicking on a neutral gray area of the image with this tool lets Lightroom know how to balance all the colours out if there is any kind of colour cast. Aside from some shadow and highlight edits the edit above was done in One click! I can't believe I have wasted my life fiddling around with colours when it was this easy...


     Now the outdoor images were much more of an issue as there wasn't any kind of neutral gray area of the picture to use as reference. I did most of these edits based on the histogram, pulling the temperature and tint sliders up and down until the colours moved to the right place. 


     Now as someone who has spent the last 8 years using artistic license rather than actual colour science I have to say I am feeling a little skeptical about this. The image above was colour corrected to the one on the right, but i much prefer the left hand image straight out of camera. It is safe to say you can follow the science all you want but this won't always make an image you like, it is worth moving away from rules every once in a while if you prefer the artistic outcome.


     I think the biggest things I got from this course are interpreting histograms, knowing how to use different tools to change the histogram data and also using clipping measures to stop blowing out shadows and highlights. I will definitely combine these skills with my own artistic eye, but I feel happy in the knowledge that I know a bit more about the colour science. 

     Here are some of my favourite images from todays edit: