Thursday 8 December 2016

Becoming a Pentaxian and Why I Love My New Camera

      As someone who had been interested in Photography for a long time, around a year ago I decided to focus on learning more and improving my skills. As far as buying cameras goes, my research and choices were pretty ill informed...
      I started out with an Olympus E-500 twin lens kit which just happened to be on a good offer at the time when my parents treated me around GCSE time. We were taking a trip to africa to go on safari and they wanted me to get some good photos. This camera lasted me for 5 years, it was pretty abysmal in anything resembling low light but otherwise gave some great colourful images. I managed to extend its life and usage using it with OM film lenses and an £11 adapter from Ebay. 


      At the start of my final year at uni I was asked to photograph my cousin's wedding, in hindsight I should have upgraded before the wedding, but I decided to put the money gained from that towards upgrading after the event! At that time I hadn't paid much attention to any of the new cameras around. After being completely overwhelmed I figured out two cameras within my budget, one by Canon one by Nikon. I chose the one edging slightly in reviews and which had a half decent deal with freebies, the Nikon D5100. 
      This camera took me through the last year of university, lots of photos for this blog, and all of my holidays and days out over the past 3 years. The D5100 is a great camera, and it did well for my needs for a long time. As an aerialist and performer, I have started photographing shows more and more in the past year, and that it where it started to let me down! Low light is always going to be a killer when it comes to photography, and as much as I could do, I wanted something a little better! 


       Around 6 months ago I started working in a camera shop, and this was where the itching started! Working for a large technology company for 2 1/2 years I tend to nerd out over things a fair amount a lot more than I did before... Being able to play around with cameras all day I was like a kid in a candy shop, it was great, but actually terribly more confusing. There is definitely no such thing as the perfect camera, and I spent a huge chunk of time being indecisive and discounting models for various reasons. Too big, too heavy, don't like the viewfinder, too expensive, horrible menu system etc. etc. 

      And then one day we had a Pentax K-70 arrive in store. Having only been announced in June, we were expected to have a play around with it and get used to its features. And so, I did the ridiculous thing and I switched systems! I traded in everything Nikon I owned and I bought K-70 with an 18-135mm and a DA 50mm prime lens. I thought for all you camera lovers out there I should explain why I went for a camera system that for most people is a bit of a curveball:

Weather Sealing - Almost all of Pentax bodies are weather sealed, and not just a little bit.. Combined with a WR lens these cameras survive a crazy amount, in Florida I was doing a timelapse of rain falling in my parents swimming pool in a tropical storm - no worries! The build quality on this camera is mad, it feels solid in your hand yet is as small as my old entry level Nikon body. 


In Camera Stabilisation - No more VR vs Non VR lenses, put any lens on this camera and it is stabilised. Everything is done in body, and it works really well. I have noticed myself taking photos and assuming they will be shaky hearing a slow shutter speed only to find they are sharp, it is like magic. 


K Mount Compatibility - Pentax have not changed their mount since their film camera days, this means you can find any old K mount film lens (of which there are hundreds) and you can stick it on your digital body. This has two advantages. One - you have access to a huge range of lenses at a lower price, you just use manual focus. Two - because of the in body stabilisation these lenses are also fully stabilised! My camera also has focus confirmation so it will beep/flash when your subject is in focus which is handy.

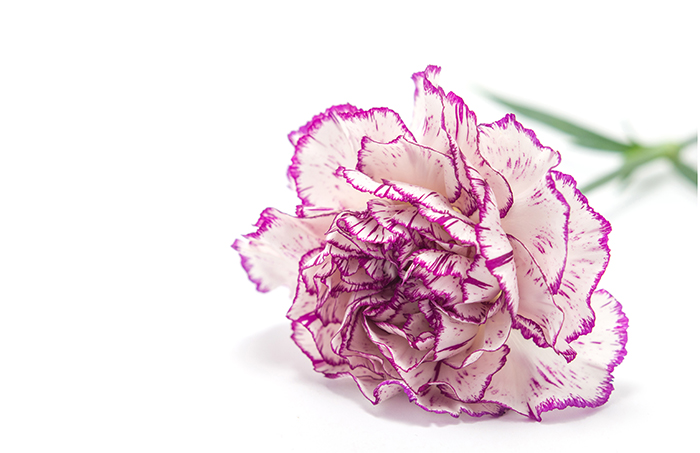
The gorgeous Sunny taken on a 135mm f2.8 film lens.

Wifi & In Camera Processing - Ok so pretty much any new camera now has Wifi but combined with the fact that I can process images in camera this has been a godsend. I can now take a RAW image, choose filters, image style, cropping etc. and save a new version directly on my camera before sending it to my phone via Wifi. My Instagram feed is now much more heavily filled with Pentax K70 images rather than low quality iphone pictures and it makes me happy how easy it is. 


In Built Intervalometer - This is something I have yet to utilise enough, but if you are into timelapse photography you will love it. I can set up my camera to take a number of photos, pick the interval, file size, file type etc. to then create timelapse videos or image sequences. Below is a very basic attempt to show the storm weather we had in Florida - don't judge I haven't spent too much time on this...

A video posted by Josie Maskell (@josiethejump) on

Multi Exposure - Harking back to anyone who used film photography this is a mode that is great fun to play around with. You can combine 2-2000 images with 3 different blending modes to create unique and interesting photos. I believe this is also designed for creating star trail or astro images which require a large number of exposures if your camera were on a tripod - as someone who has never tried this I wouldn't know where to start. 


RAW File Image Quality - Now I cannot vouch for all the new cameras, but the recovery and quality from RAW files on this camera has been incredible. I put it to test a lot on my trip to Florida in September and here are some before and after shots when recovering shadows and detail in tricky sunset/low light situations. 


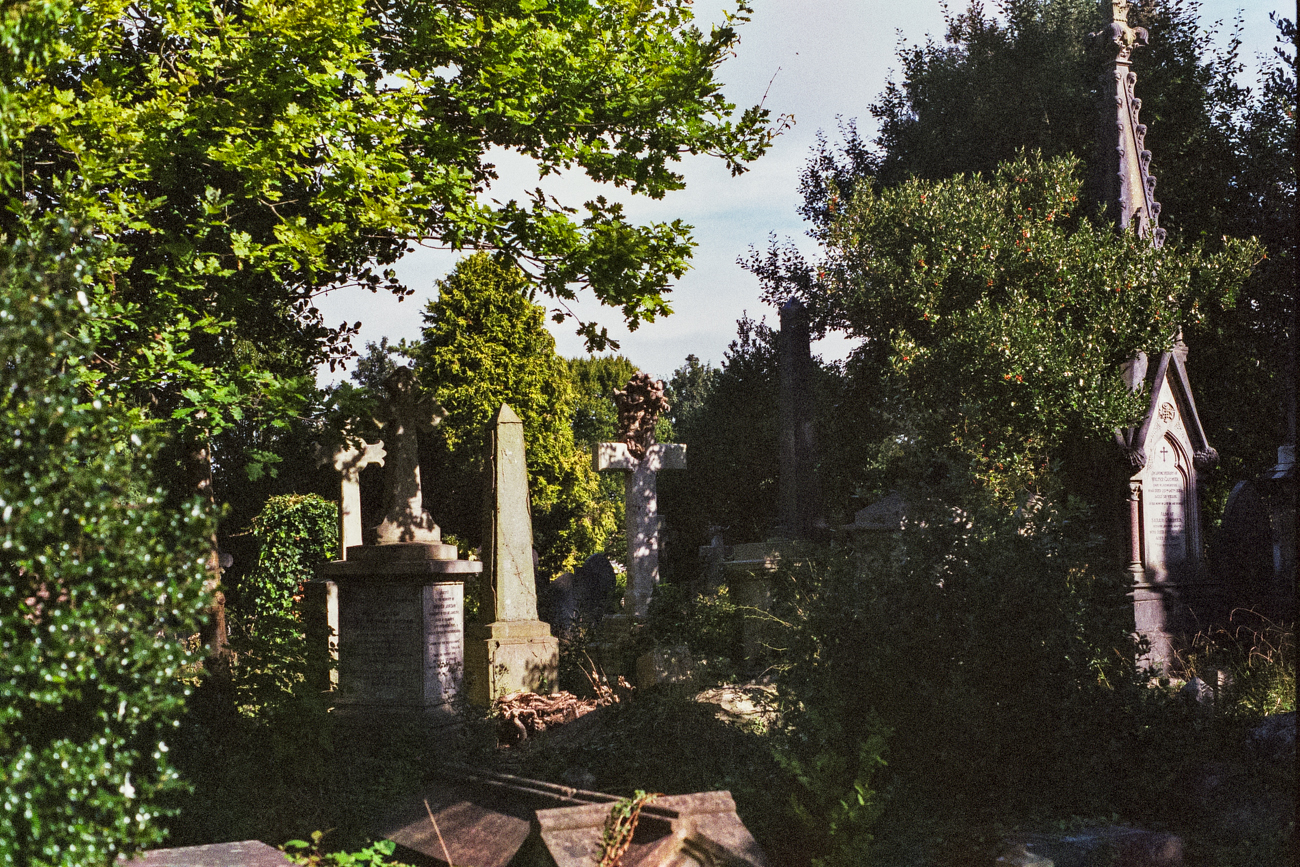
  Now obviously everyone has very specific tastes when it comes to cameras! And no camera is perfect, lens wise, the 50mm is probably my favourite for images though the screw drive autofocus is comical levels of noisy! Pentax please, please please make a budget friendly and quiet 50mm lens, the 55mm f1.4 is £650 which I can't really stretch to... Noisy lenses aside, here are a few of my favourite images from the past few months since owning this camera.


Thursday 3 November 2016

My little Box Studio

       So a few months ago I took some product photos for my friend Ellie of Eleanor Jane Jewellery. I wanted to set up some kind of mini studio to get nicely lit images at home and I wasn't sure of the best way to go about it. After speaking to people at work about the merits of soft boxes and box studios, one of them suggested I just build my own studio with a box and some white paper!
I had quite a large box from a delivery which I managed to open out. I fully lined this with white paper as well as cutting a window from the bottom of the box and a section out of one side. The window on the bottom I covered with 3 sheets of tracing paper and then flipped the whole thing over for the lamp to diffuse light through. 

       
      Now you are at this point all you need is a daylight temperature lamp, I just added this bulb to my angle poise desk lamp. And lastly a good background, whether it be pastel coloured paper or a long sheet of white pinned to the top back panel to make an infinity background. 

      I have had a pretty stressful few weeks so I decided to buy myself some flowers, though as a photographer rather than just stick them in a vase I pulled out a select few to photograph. 


      The daylight lamp works perfectly to get the right white balance, and you can move it forwards and backwards to get an even illumination on your subject. It isn't the most elaborate of studios but it works well for a lot of different subjects!!


      If you already have a lamp and a box like me this cost less than £10 to make, all i needed was paper and a bulb :). Worth a try and the results you get are great. 

Thursday 13 October 2016

Arnos Vale on Film


      A couple of weeks ago I had a day off with not a lot to do so I decided to take a couple of film cameras over to Arnos Vale Cemetery in Bristol to take some photos. This cemetery has a lot of historical graves, as well as more recent ones. It is a very interesting place to walk around and is free to enter, though it is a charity so it is good to make a donation if you can.


      All of these photos were taken on a Minolta X-300 with a 50mm f1.8 lens. I like using this camera as it is very easy to use, it auto exposes based on your Aperture setting you just have to check the light meter which flashes if you are letting too much light in for the cameras capabilities. 


      It was a nice sunny day which is good for when you walk up the hill into the woods and get all the sunlight through the leaves.


      When you get nearer the top of the hill there is an interesting sculpture, and even further up there is a building with some of Bristol's famed street art which has creeped into the boundaries of the cemetery! 


      I would definitely go for a wander round here again, they also run a lot of different events including the outdoor cinema which I hope to go to for halloween! Click here to see what is on right now :)

Thursday 15 September 2016

Saal Digital Photo Book Review

      I recently had the chance to create my own Photo Book from Saal Digital in exchange for an honest review. I was really excited for this chance, as a photographer I have a huge backlog of photos which may end up on Flickr or Facebook but never usually make it into print! I did recently get some 6x4" prints from Snapfish on an offer but the quality was just not comparable to what I see on screen! 

      I used this as an excuse to make a kind of portfolio for the images I have taken over the past year. I have been taking some online Photography courses which you can read about in previous posts, this has really improved the quality of my recent work and I wanted to see that in print. I decided to go for a wraparound cover in matte padded finish. This image taken of a lake near the hoover dam is one of my favourites with all the colours and clouds and I think it worked well.


       You don't have to have the padded cover, it is an extra, but it gives the book a nice, luxury feel. 


       For the inside I chose matte lustre finish on the paper as I tend to prefer this over gloss. The book also has flat binding so it lies perfectly flat as you turn the pages, this is another nice touch which allows your prints to not get lost in the gutter in the centre.


       The possibilities for layouts are endless in these books! They have all sorts of collage templates with the option to have many photos per page. I kept it simple with each double spread having 2-4 photos, the flat binding meant I could have photos across the centre still perfectly viewable as shown below. 


      The colour representation is really beautiful. I have a retina screen on my mac which can show every flaw in an image, but also gives great definition for sharpness versus my old screen, these prints definitely do the images justice!


       A couple of things to be careful of:

Check image size - The book creator does tell you if your images are big enough, the cover image was "good" rather than "great" in their terms which meant it wasn't pixellated but also wasn't quite as crisp as the others due to it being stretched to cover the front and back! 

Check print proofs - The below images of jewellery are both meant to be on black slate, the right image is somehow a really pale grey which wasn't how the file looked when I saved it! No idea still how that happened but make sure you double check everything before sending to print.


       Overall I would absolutely recommend Saal Digital for Photo Books, I may even try them for art prints too as they have a lot of other services on their website! I have bought photo books before as gifts, and while the printing is generally ok, they don't get even close to this one! The above book in A4 is around £44 with postage for I think a 29 page book. These are great for portfolios, wedding photos, really nice family albums and would make a very special gift for someone. 


Wednesday 13 July 2016

Photo walk around Lacock Village

      Last week on my day off I decided to get out of Bristol and go for a bit of an explore. My parents house is near Grittleton in Wiltshire, and there are many villages in the area which I used to frequent, whether on my bike or driving over for an explore! Lacock is one of my favourites, it has kept very traditional with its cobbled streets and quaint houses with decorated windows! Lacock is also famous for being featured in TV shows and films including Harry Potter, Cranford, Downton Abbey and Pride & Prejudice. 

      The lighting on this day was very flat and subdued, the skies were overcast and gray meaning a lot of the buildings I photographed needed a bit of a boost in the contrast. I have been using Lightroom more and more recently to experiment with adding my own levels of vintage style filter. I tend to do an initial lighting and colour correction edit before making a virtual copy which I then edit more heavily! 

*Quick tip - Creating virtual copies in Lightroom is great to make different versions of the same photo without losing or overriding your initial edits. Click Command+' (mac) or Control+' (windows) to create another copy of that image before adding your edits! Great for creating a colour version and then one in Black and white or sepia, or for trying a few crop variations. 

      I have been using lens correction tools to create vignetting and also playing around with split toning and camera calibration to add different tones to the images. 


      This raspberry bush really came out with this filter! I loved the subtle colours it creates. 


      The two above images both needed some contrast to bring out the patterns in the bricks and the shadows from the vines.


      Just a few of my favourites from the day! Let me know what you think, what are your favourite photography/drawing locations?!